Categoría el Sin categoría

Instalar aplicaciones con winget

winget install ––id 7zip.7zip
winget install ––id Adobe.Acrobat.Reader.64-bit
winget install ––id Notepad++.Notepad++
winget install ––id Microsoft.WindowsTerminal
winget install ––id VideoLAN.VLC


winget install –id TheDocumentFoundation.LibreOffice
winget install –id Bullzip.PDFPrinter

winget install –id Git.Git
winget install –id Microsoft.PowerShell
winget install –id Famatech.AdvancedIPScanner

winget install –id TortoiseSVN.TortoiseSVN
winget install –id TortoiseGit.TortoiseGit
winget install –id Microsoft.SQLServerManagementStudio
winget install –id Microsoft.VisualStudioCode
winget install –id Microsoft.VisualStudio.2022.Community-Preview
winget install –id Microsoft.AzureDataStudio
winget install –id OpenJS.NodeJS
winget install –id Microsoft.AzureStorageExplorer
winget install –id Microsoft.AzureCLI
winget install –id Docker.DockerDesktop

winget install –id uvncbvba.UltraVnc

winget install –id Zoom.Zoom
winget install –id FreeCAD.FreeCAD

winget install –id Microsoft.dotnetRuntime.6-x64
winget install –id Microsoft.dotnetRuntime.6-x86

[Fix] Windows 7 Keeps Checking for Updates for Hours

[Fix] Windows 7 Keeps Checking for Updates for Hours

Today in this tutorial, we are going to address one of the most annoying and strange problems present in Windows 7 operating system. This problem is related to built-in Windows Update program which regularly checks for new updates at Microsoft servers and downloads and installs them in Windows OS to keep your computer safe and faster.

PROBLEM DESCRIPTION:

Several Windows 7 users have reported that when they try to check for new updates using Windows Update, it keeps checking for updates for hours. The progress bar keeps showing progress animation which makes you think that Windows Update is doing something but even after waiting for hours, nothing happens. Windows Update just gets stuck at «Checking for updates» screen and Windows 7 doesn’t download and install any update.

Windows_7_Checking_For_Updates_Problem.png

It also affects overall system performance and if you check Task Manager, the Svchost.exe process occupies high CPU resources and memory usage. Most of the times this issue occurs after a fresh/clean installation of Windows 7.

Many users have reported that they even waited for more than 24 hours but Windows Update just stuck at «Checking for updates» status and they couldn’t install any update in their computers.

PROBLEM REASON:

The reason behind this irritating problem is a little bit funny! Actually Microsoft has released a few updates for the Windows Update client program. These updates upgrade the client program version and improve its functionality. It seems Microsoft has changed the way Windows Update client downloads and installs updates from Microsoft servers and only the new updated client is able to download updates from the servers, that’s why the older versions of Windows Update client are unable to download updates from Microsoft servers.

If the new updates which upgrade Windows Update client version, are not installed in a Windows 7 machine, it starts giving this annoying issue and the Windows Update program hangs at «Checking for updates» screen and never downloads updates from Microsoft servers.

PROBLEM SOLUTIONS:

There are a few working solutions to fix this problem. We are providing all these solutions below. You can follow these solutions one by one until your problem gets resolved:

UPDATE: Before going through all the given solutions, also check following important article:

[Important Fix] Windows 7 With No (or Incompatible) Antivirus Not Receiving New Updates

SOLUTION 1: Install Required Updates for Windows Update Client Manually

This is the best and easiest solution to fix this problem! You just need to install the required updates manually which upgrade the Windows Update client program and once you install these updates, Windows Update will be able to download and install updates from Microsoft servers without any problem.

Thanks to our readers David, Bill, TrollBytes and Steve for sharing the required updates list and providing their valuable inputs.

You need to download and install following updates manually:

These updates will upgrade the Windows Update client and will make some improvements to the client program. These updates are available for both 32-bit (x86) and 64-bit (x64) editions of Windows 7 operating system. You can know which edition of Windows 7 are you using with the help of System Properties window in Control Panel.

UPDATE: Our reader «Dan» reported that you might also need to install following updates to solve this issue:

For your convenience, we are providing direct download links of these updates. You can download the updates quickly and easily from following links:

For Windows 7 32-bit (x86) edition:

For Windows 7 64-bit (x64) edition:

After installing these updates, restart your computer and then check for new updates using Windows Update. It may take 20-30 minutes or 1 hour depending upon the speed of your Internet connection and then Windows Update will show you list of all available updates. Now Windows Update will no longer stick at «Checking for updates» screen.

NOTE: You may need to temporary stop Windows Update service before installing above mentioned updates. You can run net stop wuauserv command in Command Prompt to temporary stop Windows Update service before installing each update.

You can also use Services Manager program to stop Windows Update service. Check out METHOD 7 in following tutorial to learn more about it:

Fixing Windows 10 Automatic Updates Install Problem

SOLUTION 2: Install All Updates Using Official Convenience Rollup Package

Microsoft has released a convenience rollup pack for Windows 7 which installs almost all available updates released after SP1 (Service Pack 1) of Windows 7. So if you install this convenience rollup pack in your Windows 7 machine, it’ll automatic upgrade Windows Update client version and your problem will be solved.

To learn how to download and install this convenience rollup pack, check out following article:

Install All Post-SP1 Updates Offline in Windows 7 Using Convenience Rollup Package

SOLUTION 3: Reset Windows Update Components and Services

Sometimes these kind of problems may occur due to corrupted components and services related to Windows Update. In past, we have posted a batch script to reset Windows Update components and services to fix such kind of issues.

You can download and run the Windows Update reset script from following article:

Fix Windows Update Problems Using Automatic Reset Script

SOLUTION 4: Use Windows Update Troubleshooter and Fixit Tool

Windows 7 provides a built-in troubleshooter to fix issues related to Windows Update. You can run the built-in troubleshooter to repair Windows Update program. Microsoft also provides an official Fixit tool to fix Windows Update related problems.

You can learn more about the built-in troubleshooter and official Fixit tool in following article:

[FIX] Error Message «0x80070424» Received in Windows Update

SOLUTION 5: Use Custom DNS Settings for Your Internet Connection

Sometimes this problem may also occur due to your Internet connection if the DNS server of your ISP is not updated. You can use external DNS settings to get faster and reliable Internet connection which may also solve Windows Update related problems.

To learn how to use custom DNS settings in Windows, check out following tutorial:

How to Change or Use Custom DNS Server Settings in Windows?

SOLUTION 6: Use Built-in System File Checker (SFC) Tool

If some files and settings related to Windows Update are corrupted or missing in your Windows OS, it may also cause such kind of issues. You can repair Windows and restore default system files with the help of built-in SFC tool.

You can learn more about SFC tool and how to use it by going through METHOD 4 in following tutorial:

[METHOD 4] How to Use SFC /SCANNOW Command in Windows?

=== === === === === === === === ===

That’s it. The above mentioned solutions will definitely help you in fixing this annoying issue in Windows 7  as well as other Windows versions.
Switch Windows 10 from RAID/IDE to AHCI

Some systems will have the Windows operating system installed using RAID drivers including the Intel Rapid Storage Technology. SSD drives typically perform better using AHCI drivers.  There is in fact a way to switch operation from either IDE / RAID to AHCI within Windows 10 without having to reinstall.  Here are the steps:

  1. Click the Start Button and type cmd
  2. Right-click the result and select Run as administrator
  3. Type this command and press ENTER: bcdedit /set {current} safeboot minimal (ALT: bcdedit /set safeboot minimal)
  4. Restart the computer and enter BIOS Setup
  5. Change the SATA Operation mode to AHCI from either IDE or RAID
  6. Save changes and exit Setup and Windows will automatically boot to Safe Mode.
  7. Right-click the Windows Start Menu once more. Choose Command Prompt (Admin).
  8. Type this command and press ENTER: bcdedit /deletevalue {current} safeboot (ALT: bcdedit /deletevalue safeboot)
  9. Reboot once more and Windows will automatically start with AHCI drivers enabled.

Instalar módulos de Azure en PowrShell

[Net.ServicePointManager]::SecurityProtocol = [Net.SecurityProtocolType]::Tls12
Set-ItemProperty -Path 'HKLM:\SOFTWARE\Wow6432Node\Microsoft\.NetFramework\v4.0.30319' -Name 'SchUseStrongCrypto' -Value '1' -Type DWord

Register-PSRepository -Default


Install-Module MSOnline

$Msolcred = Get-credential
Connect-MsolService -Credential $MsolCred

Opcional:

Install-PackageProvider -Name NuGet -MinimumVersion 2.8.5.201 -Force

Install-Module -Name PowerShellGet -RequiredVersion 2.2.5 -Force

Instalar SQL Server 2019 en Windows 11

El problema son los sectores, SQL necesita 4KB y el sistema operativo utiliza 16KB o 32KB.
Hay un artículo de Microsoft que explica esto:

https://docs.microsoft.com/es-es/troubleshoot/sql/admin/troubleshoot-os-4kb-disk-sector-size

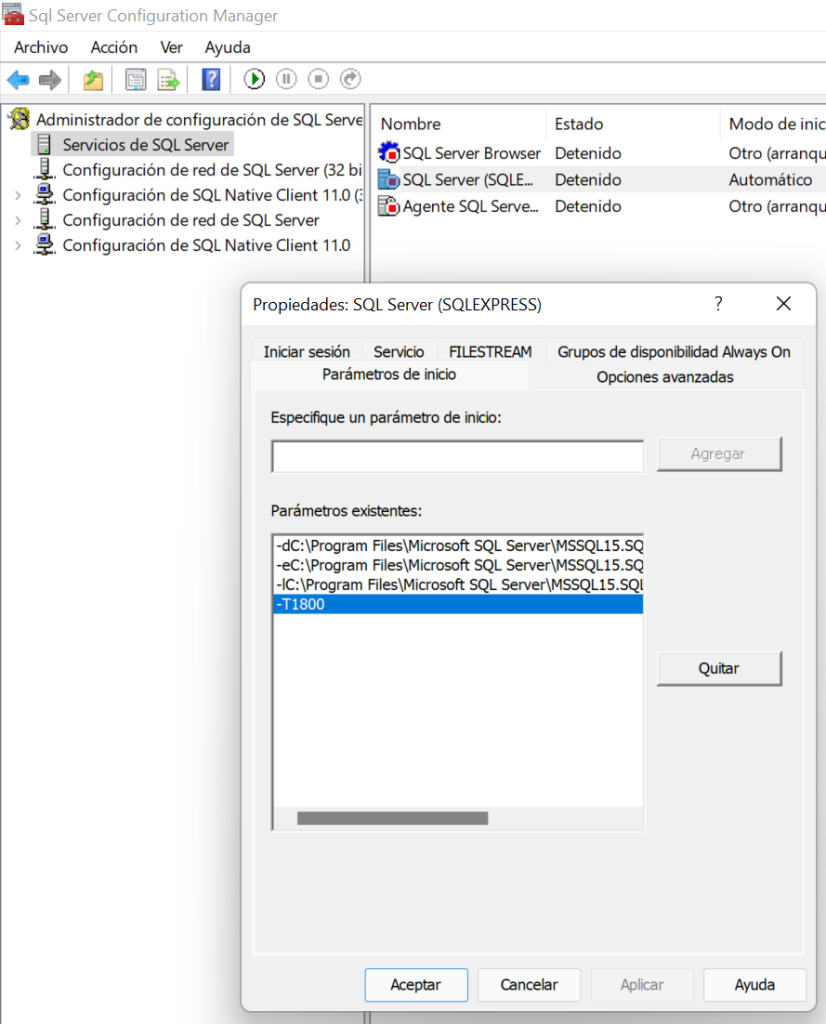
Lo que hay que hacer es iniciar SQL con DBCC TRACEON 1800.
En configuración de SQL Manager añadir el parámetro -T1800

Probablemente de un error que no se encuentra la BBDD:

d:\dbs\sh\s19s\0924_133725\cmd\2\obj\x64retail\sql\mkmastr\databases\mkmastr.proj

Esto es porque no apunta correctamente la BBDD master.
Hay que copiar de otra instalación de SQL SERVER las BBDD: master, model, MSDBData, temp en la carpeta de instalación.

Después ejecutar los siguientes comandos:

NET START MSSQL$SQLEXPRESS /f /T1800
ó
C:\Program Files\Microsoft SQL Server\MSSQL15.SQLEXPRESS\MSSQL\Binn> .\sqlservr.exe -sSQLEXPRESS /f /T1800

Luego ejecutar los siguientes comandos

SQLCMD -S .\SQLEXPRESS

1>SELECT name, physical_name, state_desc FROM sys.master_files ORDER BY database_id;

Ahora observe esos nombres de archivo incorrectos; y ejecuta los siguientes comandos…

Nota: debe cambiar la ubicación del nombre del archivo…

2>ALTER DATABASE model MODIFY FILE ( NAME = modeldev, FILENAME = 'C:\Program Files\Microsoft SQL Server\MSSQL15.SQLEXPRESS\MSSQL\DATA\model.mdf');
3>ALTER DATABASE model MODIFY FILE ( NAME = modellog, FILENAME = 'C:\Program Files\Microsoft SQL Server\MSSQL15.SQLEXPRESS\MSSQL\DATA\modellog.ldf');

4>ALTER DATABASE msdb MODIFY FILE ( NAME = MSDBData, FILENAME = 'C:\Program Files\Microsoft SQL Server\MSSQL15.SQLEXPRESS\MSSQL\DATA\MSDBData.mdf');
5>ALTER DATABASE msdb MODIFY FILE ( NAME = MSDBLog, FILENAME = 'C:\Program Files\Microsoft SQL Server\MSSQL15.SQLEXPRESS\MSSQL\DATA\MSDBLog.ldf');

6>ALTER DATABASE tempdb MODIFY FILE ( NAME = tempdev, FILENAME = 'C:\Program Files\Microsoft SQL Server\MSSQL15.SQLEXPRESS\MSSQL\DATA\temp.mdf');
7>ALTER DATABASE tempdb MODIFY FILE ( NAME = templog, FILENAME = 'C:\Program Files\Microsoft SQL Server\MSSQL15.SQLEXPRESS\MSSQL\DATA\temp.ldf');

8>GO

9>EXIT

NET STOP MSSQL$SQLEXPRESS

Ocultar usuario en inicio de sesión

How to hide user accounts from the sign-in screen

Windows 10 by default displays the full name on a user on the sign-in screen, but to make this work you’ll need the name of the account. You can find this information by opening Local Users and Groups. However, this option is only available for Pro users, as such we’ll be using the old User Accounts manager that is available on Windows 10 Pro as well as on Windows 10 Home.

  1. Use the Windows key + R keyboard shortcut to open the Run command, type netplwiz, and click OK to open User Accounts.
  2. Select the account you want to hide and click Properties.
  3. Make note of the User name for the account.

Use the following steps to hide an account from sign-in screen on Windows 10:

  1. Use the Windows key + R keyboard shortcut to open the Run command, type regedit, and click OK to open the Windows Registry.
  2. Browse the following path:HKEY_LOCAL_MACHINE\SOFTWARE\Microsoft\Windows NT\CurrentVersion\Winlogon
  3. Right-click the Winlogon, select New, and click Key.
  4. Name the new key SpecialAccounts.
  5. Right-click the SpecialAccounts key, select new, and click Key.
  6. Name the new key UserList.
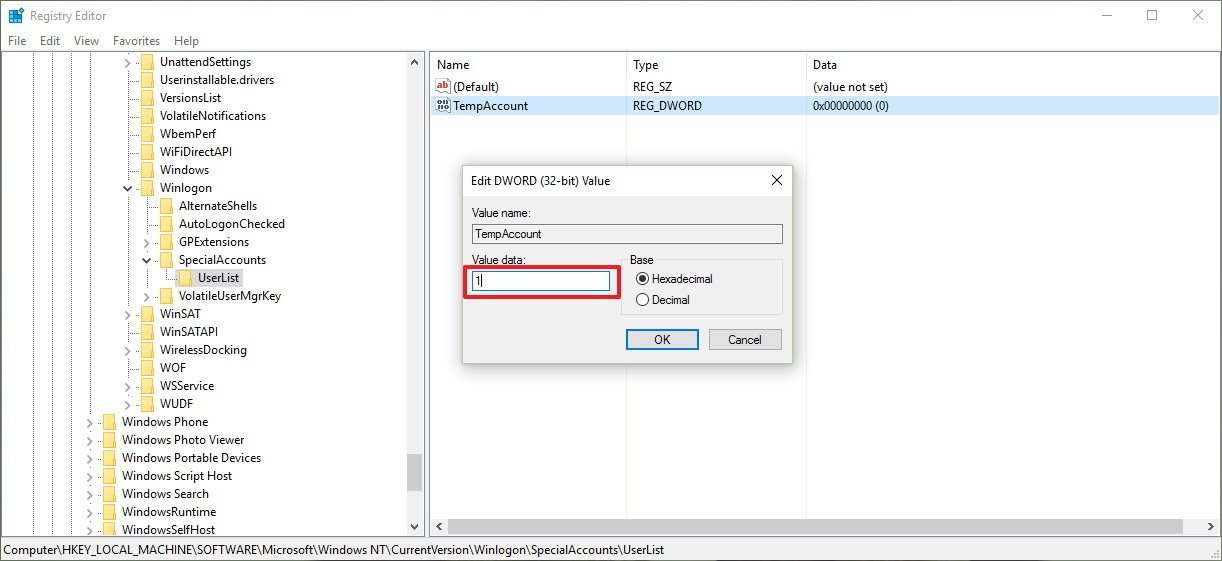
  7. Inside of UserList, right-click, select New, and click DWORD (32-bit) Value.
  8. Name the new DWORD key with the name of the account you’re trying to hide.
  9. Double-click the new DWORD key and make sure its data value is set to 0.

Sign-out and you’ll now notice that the account will no longer be available on the sign-in screen. In fact by doing this, you’re also hiding the account from virtually everywhere in the operating system, including the from the switch user menu in the Start menu, from Control Panel, and even from the Settings app.

In order to make a hidden account visible again, you’ll have to go back to the registry UserList key using the steps mentioned above, and making sure to change the user name data key value from 0 to 1.

If you’re only hiding a remote user account, you don’t need to do anything else, as the user can login remotely without any issues.

Keep in mind that while this guide will help you to remove user accounts from the sign-in screen, it’s not recommended to remove all the accounts, including your own, as you may find tough to get back in.

These steps work on Windows 10, and it should also work on Windows 8.1 and Windows 7.

Acceso remoto a \\EQUIPO\C$

Introducción

El control de cuentas de usuario (UAC) es un nuevo componente de seguridad de Windows Vista. UAC permite a los usuarios realizar tareas diarias comunes como no administradores. Estos usuarios se denominan usuarios estándar en Windows Vista. Las cuentas de usuario que son miembros del grupo administradores locales ejecutarán la mayoría de las aplicaciones mediante el principio de privilegios mínimos. En este escenario, los usuarios con privilegios mínimos tienen derechos similares a los derechos de una cuenta de usuario estándar. Sin embargo, cuando un miembro del grupo administradores local tiene que realizar una tarea que requiere derechos de administrador, Windows Vista solicita automáticamente al usuario la aprobación.

Cómo funcionan las restricciones remotas de UAC

Para proteger mejor a los usuarios que son miembros del grupo administradores locales, implementamos restricciones UAC en la red. Este mecanismo ayuda a evitar ataques de bucle atrás. Este mecanismo también ayuda a evitar que el software malintencionado local se ejecute de forma remota con derechos administrativos.

Cuentas de usuario locales (cuenta de usuario del Administrador de cuentas de seguridad)

Cuando un usuario que es miembro del grupo Administradores local en el equipo remoto de destino establece una conexión administrativa remota mediante el comando de uso de red, por ejemplo, no se conectará como *\\remotecomputer\Share$ administrador completo. El usuario no tiene ningún potencial de elevación en el equipo remoto y el usuario no puede realizar tareas administrativas. Si el usuario desea administrar la estación de trabajo con una cuenta del Administrador de cuentas de seguridad (SAM), el usuario debe iniciar sesión de forma interactiva en el equipo que se va a administrar con Asistencia remota o Escritorio remoto, si estos servicios están disponibles.

Cuentas de usuario de dominio (cuenta de usuario de Active Directory)

Un usuario que tiene una cuenta de usuario de dominio inicia sesión de forma remota en un equipo Windows Vista. Además, el usuario de dominio es miembro del grupo Administradores. En este caso, el usuario de dominio se ejecutará con un token de acceso de administrador completo en el equipo remoto y UAC no estará en vigor.

 Nota

Este comportamiento no es diferente del comportamiento de Windows XP.

Cómo deshabilitar las restricciones remotas de UAC

 Importante

Esta sección, método o tarea contiene pasos que le indican cómo modificar el Registro. No obstante, pueden producirse problemas graves si modifica el registro de manera incorrecta. En consecuencia, asegúrese de seguir estos pasos cuidadosamente. Para mayor protección, cree una copia de seguridad del registro antes de modificarlo. Después, puede restaurar el registro si se produce un problema. Para obtener más información acerca de cómo hacer una copia de seguridad y restaurar el Registro, vea How to back up and restore the registry in Windows.

Para deshabilitar las restricciones remotas de UAC, siga estos pasos:

  1. Haga clic en Inicio , haga clic en Ejecutarescriba regedit y, a continuación, presione ENTRAR.
  2. Busque la siguiente subclave del registro y haga clic en ella:HKEY_LOCAL_MACHINE\SOFTWARE\Microsoft\Windows\CurrentVersion\Policies\System
  3. Si la LocalAccountTokenFilterPolicy entrada del Registro no existe, siga estos pasos:
    1. En el menú Editar, elija Nuevo y, a continuación, seleccione Valor DWORD.
    2. Escriba LocalAccountTokenFilterPolicy y, a continuación, presione ENTRAR.
  4. Haga clic con el botón secundario en LocalAccountTokenFilterPolicy y, a continuación, seleccione Modificar.
  5. En el cuadro Datos de valor, escriba 1 y, a continuación, seleccione Aceptar.
  6. Salga del Editor del Registro.

¿Corrija el problema?

Compruebe si se ha solucionado el problema. Si el problema no se soluciona, póngase en contacto con el soporte técnico.

Configuración remota de UAC

La entrada del Registro LocalAccountTokenFilterPolicy puede tener un valor de 0 o 1. Estos valores cambian el comportamiento de la entrada del Registro al descrito en la tabla siguiente.

ValorDescripción
0Este valor crea un token filtrado. Es el valor predeterminado. Se quitan las credenciales de administrador.
1Este valor crea un token elevado.

Resetear contraseña de Ubuntu en WSL en Windows 10

Si quieres instalar algo dentro del shell de Ubuntu y no recuerdas cuál era la contraseña:

  • Abre Bash en Ubuntu y apunta el nombre de usuario de Linux (tenga en cuenta que puede coincidir o no con su nombre de usuario de Windows)
  • Cierre su sesión de bash, debe hacer esto para que funcionen los siguientes comandos.
  • Abre el símbolo del sistema de Windows como administrador
  • Escribe : ubuntu config --default-user root para establecer el usuario predeterminado como root.
  • Para cambiar la contraseña de su cuenta, passwd [nombre de usuario] y siga las instrucciones para restablecer su contraseña. Cierre el shell de Ubuntu.
  • Ahora desea volver a cambiar su shell de Ubuntu para que su perfil sea el usuario predeterminado. Dentro de un símbolo del sistema de Windows, ejecute el siguiente comando ubuntu config --default-user [nombre de usuario]
  • Ahora, cuando abra su shell de Ubuntu, su perfil se abrirá por defecto al suyo y se restablecerá la contraseña.